Logic Pro's Match EQ: A Basic Guide
Hello, everyone, and thanks for joining me in another episode of our Logic Pro plugin series. Today, we're diving into one of Logic Pro's more advanced and lesser-known tools: the Match EQ. This plugin can be a game-changer for your audio production, helping you fine-tune your tracks and create the perfect sonic balance. So, if you're eager to learn more about this incredible tool, don't forget to subscribe to the blog and check out my YouTube Channel for more exciting Logic Pro insights. Let's get started!
Getting to Know the Match EQ
The Match EQ is a remarkable plugin within Logic Pro designed to analyze, adapt, and match the frequency characteristics of one audio source to another. By comparing your current audio (which you want to modify) with a reference audio source, Match EQ generates an EQ curve that automatically adjusts your audio to resemble the reference.
Let's go through the basics of using this plugin:
1. Accessing the Match EQ
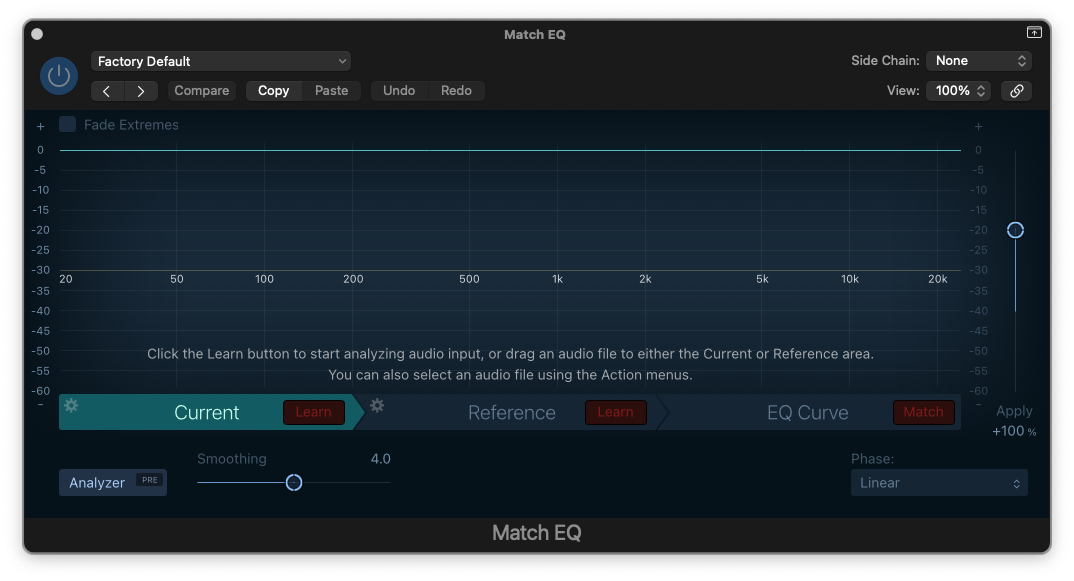
To begin, launch Logic Pro and navigate to the Match EQ plugin. To find it, follow this path: Logic Pro > EQ > Match EQ (Stereo). Once you're there, you'll see the Match EQ interface, which bears some resemblance to Logic Pro's Channel EQ.
2. Key Components of Match EQ
Before we dive into practical applications, let's take a quick look at the essential components of the Match EQ:
Current: This tab represents the audio you're looking to modify.
Reference: This tab serves as the source you want to match your audio to.
EQ Curve: This section displays the generated EQ curve after analyzing both the current and reference audio. Feel free to click, drag and make manual adjustments in here.
Analyzer: Like the Channel EQ analyzer, this visual representation helps you understand the frequency spectrum of your audio.
Smoothing: Use this to control the jaggedness (Q-width, how smooth the curves are) of the EQ adjustments.
Channel Link: Choose which audio channels you want to apply Match EQ to. (Left, Right, Stereo)
Phase: Options include Linear, Minimal, and Minimal Zero Latency, which affect phase alignment.
How Match EQ Works
My favorite use of the Match EQ is to create space for your audio by matching its frequency response with that of your reference audio. To illustrate this concept, let's walk through an example:
Scenario: We want to make room for a vocal in a mix by adjusting the EQ curve of an electric guitar.
Current EQ Curve: First, select the "Current" tab and hit "Learn." This step involves analyzing the frequency response of the electric guitar.
Reference Audio: Switch to the "Reference" tab. Now, you need to provide a reference spectrum. You have three options: load a reference spectrum from a file, generate a reference spectrum from an audio file, or listen to a side-chain audio (for instance, your vocal).
Generate the EQ Curve: With the current and reference audio in place, head over to the "EQ Curve" tab. Press "Match," and the Match EQ will generate an EQ curve. This curve adjusts the electric guitar's frequencies to better match the reference.
Adjusting the Matching: The generated EQ curve can be intense. To control the amount of matching, adjust the "Apply Percentage." A 100% match means the EQ curves closely resemble each other, while lowering this value allows more of the original character to remain.
Customizing Your Match EQ
There are several customization options for fine-tuning the Match EQ:
Fade Extremes: By enabling this option, you can gently reduce the extreme lows and highs. This is useful when handling a wide frequency range, such as during mastering.
Smoothing: You can adjust smoothing to create a gentler EQ curve.
Channel Selection: Choose which audio channels (left, right, or stereo) you want to affect with Match EQ.
Clear and Save: You can clear your current spectrum, copy and paste EQ curves, or even save them for later use.
Conclusion:
Logic Pro's Match EQ is a powerful tool for enhancing your audio production. Whether you need to make room for vocals, match guitar tones, or perfect your mixes, Match EQ can help you achieve a more balanced sound effortlessly.
If you have any questions or need further clarification about this plugin, don’t hesitate to reach out to the video on my YouTube Channel (also embedded below). Don't forget to like and subscribe for more tutorials and insights. Thanks for joining me, and happy mixing!
